Improving Your Visibility with a Channel Letter Sign
Electrical, or channel lettering signs, are a great way to grab attention from local traffic! But also, you may be wondering what your needs truly are, and everything it entails.
These signs are typically lit with LED’s, be it front-lit, back-lit, or both! However, there are non-lit options. You may want a non-lit sign for budgetary reasons, because the building or lease agreement doesn’t allow for it, or purely for aesthetic purposes. Electrical signs will typically use 110
Quality channel lettering signs are built with aluminum, durable sign-grade acrylic, and robust LED modules to withstand both heat and cold. Signs should be UL compliant, to match state and city guidelines. Cities will typically perform inspections after the sign has been installed to your building, to make sure it is up to code. Signs also don’t have to be just outdoors, but can be wired up to interior spaces, such as indoor reception areas and malls.
If anything is to break or burn out (such as a power supply or wire), channel letter signs can be repaired. New faces can be constructed and replaced. The shaped aluminum channel can be re-used. The letters can even be removed from the wall and moved to a new location, should you move to another building.
Energy consumption of a sign depends on the overall size. 160 watt power supplies are typically used, and multiple power supplies can power a single sign, with different sections of the sign wired up to power.
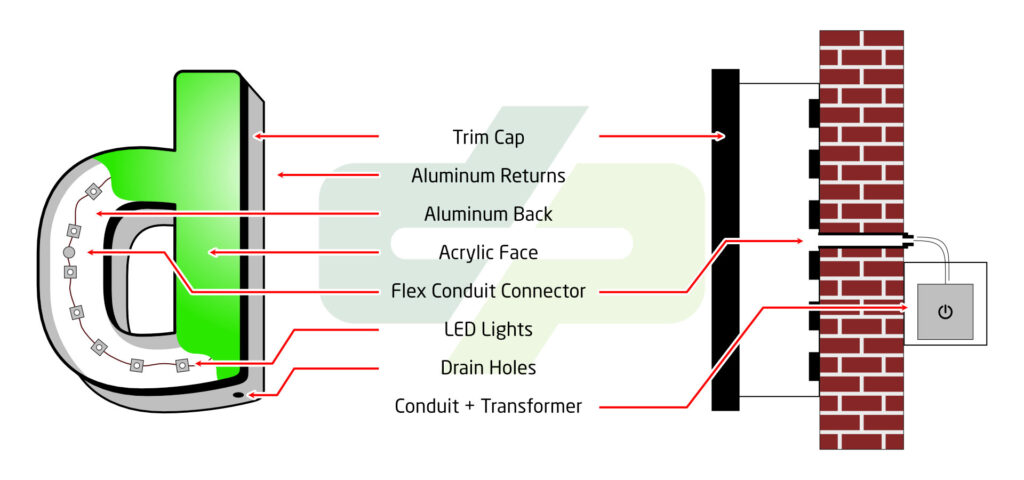
Another factor to consider is how you prefer the sign to be mounted to the wall. The simplest option is a Direct Flush Mount, where holes are drilled into the wall for the wiring to be fed through. The end result is the cleanest-looking, and most professional; however, you may have reasons to consider other options.
A diagram demonstrating a Direct Flush Mount option for a channel lettering sign.
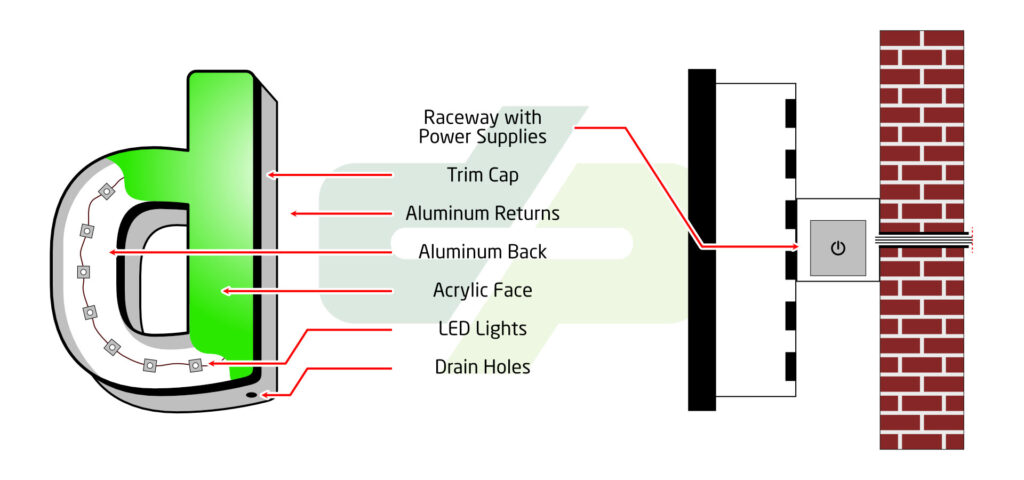
Raceway Mounts add some additional cost for fabrication, but not as many holes will need to be drilled into the wall, as all of the wiring and electrical components are housed in an aluminum box that sits behind the letters and logos themselves. These can be painted to match a wall or to fit other branding guidelines. Sometimes, a landlord will request that signs are installed with a Raceway.
A diagram demonstrating a Raceway Mount option for a channel lettering sign.
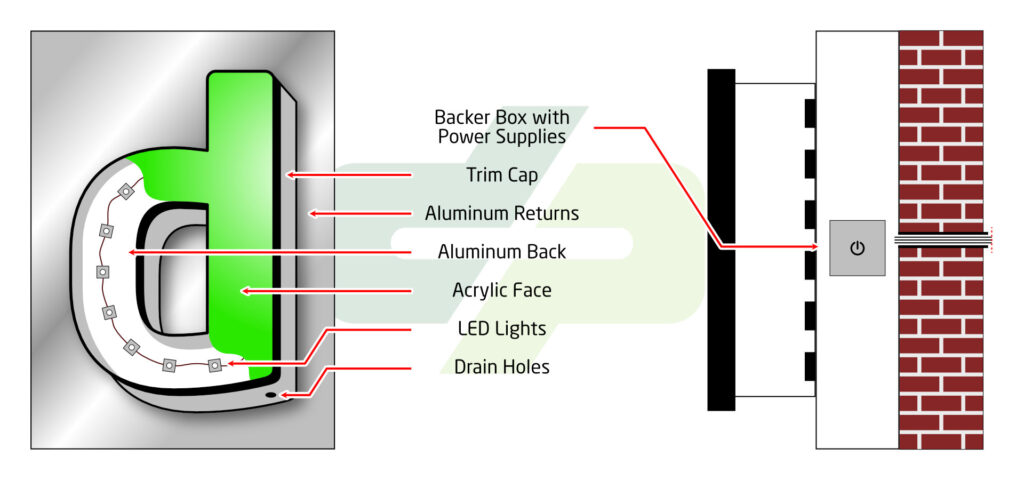
Backer Mounts are another option, which functions similar to a raceway, but the backer box is made to be larger than the sign itself, usually to accent the letters or the logo in some way. These can be painted according to brand guidelines, or customized in other ways, such as with a brushed aluminum finish.
A backer mount is similar to a raceway mount, except the section behind the sign also serves a decorative purpose.
Once you have decided the direction you want to take your sign, it’s time to get the order started. These are the steps that are taken once a project has begun, and artwork is submitted:
A site survey is scheduled to a provided address, typically within 1-2 weeks. Measurements of the building are taken, which can help determine the final size of the sign. Status of the electrical hook-ups (if applicable) are assessed, and any potential obstructions can be accounted for. If an existing sign is being updated, the technician performing the survey will also assess the lights. There is a cost, typically ranging between $350-$750 per sign.
The sign installer will check with the city’s regulations. It’s necessary to check the zone for the building’s address, as this will also determine how large the sign can be, or if a typical lit sign is allowed. Building sign allowances can vary from city to city.
A proof is created for both the client and city approval. The sign’s size is noted also as a percentage of the building’s visible surface area. A price quote may be provided at this time, since the sign’s material costs, estimated time to install, and permit acquisitions fees are known. The city’s permit costs are usually marked “TBA”, since they assess the permit cost based on multiple factors (cost to build the sign, the zone the building is in, etc.).
Once the proof is approved, it’s submitted to the city for a permit. This usually takes 1-4 weeks, though it can take even longer, as this all depends on the city’s response and time taken to look at the permit application.
After the city grants the permit, construction can begin! The usually takes 1-3 weeks to complete.
Shipping and freight may be required. If this is a required step, this will be included in the quote.
An install is scheduled during the construction phase. A time frame will be determined based on current schedule openings.
Once the sign has been installed, the city will schedule an inspection and sign off on the project. A final invoice will be issued at this point.
Ready to get started on your next branding adventure? Use our channel letter order form at Dreamscape Printing! We are a full service sign shop, and will take care of everything for you, so that you don’t have to worry about the hassle of calling separate companies to construct your sign and install it!
 Sign In